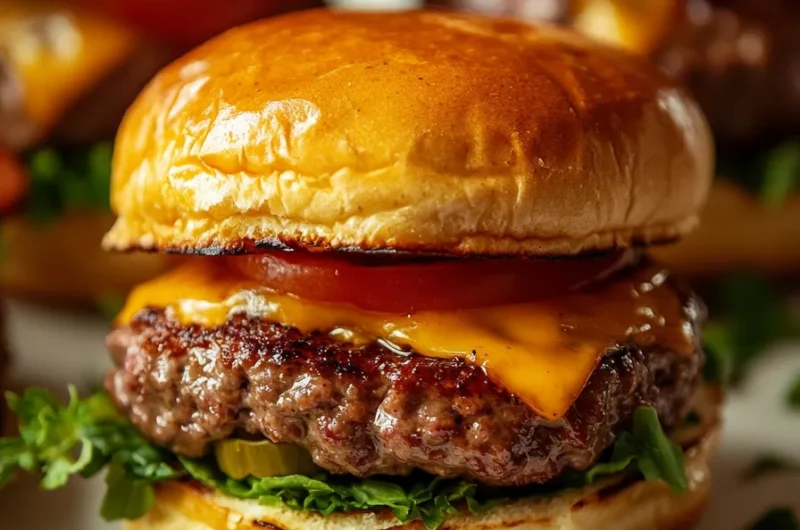
Cheeseburger sliders are a delightful twist on the classic cheeseburger, bringing the same amazing flavors in a miniaturized form. These bite-sized burgers are perfect for gatherings, game days, or simply a fun family dinner. Whether you’re hosting a party or having a cozy night in, cheeseburger sliders are sure to please everyone and satisfy those craving comfort food. The versatility and ease of preparation make them a go-to recipe for both novice cooks and seasoned chefs.
If you have ever experienced the joy of biting into a perfectly crafted cheeseburger slider, you understand the magic that happens when a soft bun meets juicy meat and gooey cheese. These sliders are not just about taste; they’re an experience that combines social dining and delicious flavors. In this article, you will discover why this recipe stands out, the straightforward steps for making it, and great serving suggestions. Get ready to elevate your culinary game with these incredible cheeseburger sliders!
With layers of flavor and fun, cheeseburger sliders are a guaranteed hit. They can be fully customized with your favorite toppings, sauces, and cheeses. From tangy pickles to crispy bacon or freshly sliced tomatoes, the possibilities are endless. Plus, they’re easy to prepare and can serve as a delightful appetizer or main course. Let’s dive deep into what makes these cheeseburger sliders so incredibly special!
Why You’ll Love This Recipe
Cheeseburger sliders are more than just a small version of a cheeseburger; they are a delightful culinary creation that everyone will enjoy. Here are several reasons why you will love making and serving them:
1. Quick and Easy: The entire preparation time is minimal, allowing you to whip these up in no time.
2. Crowd-Pleaser: Perfect for large gatherings, everyone loves sliders!
3. Customizable: Choose your favorite toppings and condiments to suit your taste.
4. Kid-Friendly: The mini size is perfect for kids, making them easy to handle.
5. Versatile Sides: Pair them with a variety of sides such as fries, salads, or veggie sticks.
6. Flavor Explosion: Each bite packs in juicy meat, melty cheese, and all the toppings you desire.
These factors contribute to making cheeseburger sliders a fantastic addition to your kitchen repertoire. The joyful experience of sharing small bites filled with flavors is sure to leave your guests craving more!
Preparation and Cooking Time
Making cheeseburger sliders is not only delicious but also quick and simple. Here’s a breakdown of the time you will need:
– Preparation Time: 20 minutes
– Cooking Time: 15-20 minutes
– Total Time: Approximately 35-40 minutes
This rapid turnaround gives you ample time to enjoy the meal and spend time with loved ones instead of being stuck in the kitchen.
Ingredients
– 1 pound ground beef (80/20)
– 1 tablespoon Worcestershire sauce
– 1 teaspoon garlic powder
– 1 teaspoon onion powder
– Salt and pepper (to taste)
– 12 slider buns
– 12 slices of cheddar cheese (or cheese of your choice)
– Pickles (dill or sweet, depending on preference)
– Ketchup (optional)
– Mustard (optional)
– Lettuce (optional)
– Tomato slices (optional)
Step-By-Step Instructions
Making cheeseburger sliders is a straightforward process. Just follow these steps:
1. Preheat Oven: Preheat your oven to 350°F (175°C).
2. Prepare Beef Mixture: In a large bowl, combine the ground beef, Worcestershire sauce, garlic powder, onion powder, salt, and pepper. Mix well.
3. Form Patties: Divide the beef mixture into 12 equal portions and shape them into small patties.
4. Cook Patties: Heat a skillet over medium-high heat. Cook the patties for about 3-4 minutes on each side until they reach your desired level of doneness.
5. Add Cheese: During the last minute of cooking, place a slice of cheese on each patty and cover the skillet to allow the cheese to melt.
6. Prepare Sliders: Cut the slider buns in half. Place a cooked patty on the bottom half of each bun.
7. Add Toppings: Top each patty with pickles, ketchup, mustard, lettuce, and tomato as desired.
8. Assemble Sliders: Place the top half of the bun on each slider.
9. Bake Sliders: Arrange the assembled sliders on a baking sheet and bake in the preheated oven for about 10 minutes until they are warmed through and the buns are slightly toasted.
10. Serve: Remove from the oven and let cool briefly before serving. Enjoy!
These steps will guide you toward creating some mouth-watering cheeseburger sliders that will surely delight your taste buds!
How to Serve
When it comes to serving cheeseburger sliders, presentation and pairing are key to enhancing the experience:
1. Bun Choices: Opt for fluffy brioche or whole wheat buns for a unique twist.
2. Serving Platter: Arrange sliders on a large platter for a visually appealing presentation.
3. Accompaniments: Serve with a side of fries, chips, or a fresh salad to balance the meal.
4. Dipping Sauces: Include a variety of dipping sauces like BBQ, spicy mayo, or ranch to cater to different palates.
5. Family Style: Encourage guests to customize their sliders at a toppings bar with various condiments, lettuce, tomato, and different cheeses.
6. Garnish: Add fresh herbs or a sprinkle of sesame seeds on top of the sliders for a pop of color.
These serving suggestions will elevate your cheeseburger sliders and make the dining experience unforgettable for everyone. Enjoy the amazing flavors and enjoy making delightful moments with your loved ones!
Additional Tips
– Use Fresh Ingredients: Using fresh, high-quality ingredients enhances the overall taste of cheeseburger sliders.
– Season Generously: Don’t hold back on the seasoning in the meat mixture; it’s vital for flavor.
– Broil for Extra Crispiness: For a crispier bun top, consider broiling sliders for the last minute of cooking.
Recipe Variation
Feel free to explore these exciting variations of cheeseburger sliders:
1. Spicy Sliders: Add diced jalapeños or a sprinkle of cayenne pepper to the beef mixture for a spicy kick.
2. Cheesy Bacon Sliders: Wrap each patty with a strip of bacon before cooking for a smoky flavor and extra crispiness.
3. Veggie Sliders: Substitute beef with black beans or chickpeas and add spices for a delicious vegetarian option.
Freezing and Storage
– Storage: Uncooked cheeseburger patties can be covered and refrigerated for up to 24 hours before cooking.
– Freezing: You can freeze cooked sliders for up to 3 months. Store them in an airtight container to avoid freezer burn. Thaw in the refrigerator and reheat before serving.
Special Equipment
To make the preparation of cheeseburger sliders easier, consider using the following tools:
– Non-stick skillet or grill pan
– Spatula for flipping patties
– Baking sheet for toasting the assembled sliders
– Measuring cups and spoons for precise ingredient measurement
– Mixing bowl for combining ingredients
Frequently Asked Questions
Why are my sliders falling apart?
This can happen if the meat mixture lacks binding ingredients. Ensure you’ve combined the meat mixture well and consider adding breadcrumbs or an egg if needed.
Can I prepare the patties in advance?
Yes! You can form the patties ahead of time and keep them covered in the refrigerator for a day or freeze them for longer storage.
What toppings do you recommend?
Classic toppings include cheese, ketchup, mustard, pickles, onions, and tomatoes. However, feel free to get creative with your favorites!
How do I reheat frozen cheeseburger sliders?
Thaw in the refrigerator overnight and then reheat in the oven at 350°F (175°C) for about 10-15 minutes until warmed through.
Can I use alternative meats?
Absolutely! Ground turkey, chicken, or even plant-based ground meat works wonderfully in this recipe.
Conclusion
Cheeseburger sliders are a fun and delicious twist on the classic burger, perfect for any occasion. Their mini size makes them ideal for sharing, while the customizable aspects allow everyone to create their perfect bite. By following this comprehensive recipe and suggestions, you will create sliders that are flavorful and satisfying. So, gather your friends and family, and enjoy the tasty experience of cheeseburger sliders at your next gathering!
Cheeseburger Sliders: An Amazing Ultimate Recipe

- Prep Time: 15 minutes
- Cook Time: 20 minutes
- Total Time: 35 minutes
Ingredients
– 1 pound ground beef (80/20)
– 1 tablespoon Worcestershire sauce
– 1 teaspoon garlic powder
– 1 teaspoon onion powder
– Salt and pepper (to taste)
– 12 slider buns
– 12 slices of cheddar cheese (or cheese of your choice)
– Pickles (dill or sweet, depending on preference)
– Ketchup (optional)
– Mustard (optional)
– Lettuce (optional)
– Tomato slices (optional)
Instructions
Making cheeseburger sliders is a straightforward process. Just follow these steps:
1. Preheat Oven: Preheat your oven to 350°F (175°C).
2. Prepare Beef Mixture: In a large bowl, combine the ground beef, Worcestershire sauce, garlic powder, onion powder, salt, and pepper. Mix well.
3. Form Patties: Divide the beef mixture into 12 equal portions and shape them into small patties.
4. Cook Patties: Heat a skillet over medium-high heat. Cook the patties for about 3-4 minutes on each side until they reach your desired level of doneness.
5. Add Cheese: During the last minute of cooking, place a slice of cheese on each patty and cover the skillet to allow the cheese to melt.
6. Prepare Sliders: Cut the slider buns in half. Place a cooked patty on the bottom half of each bun.
7. Add Toppings: Top each patty with pickles, ketchup, mustard, lettuce, and tomato as desired.
8. Assemble Sliders: Place the top half of the bun on each slider.
9. Bake Sliders: Arrange the assembled sliders on a baking sheet and bake in the preheated oven for about 10 minutes until they are warmed through and the buns are slightly toasted.
10. Serve: Remove from the oven and let cool briefly before serving. Enjoy!
These steps will guide you toward creating some mouth-watering cheeseburger sliders that will surely delight your taste buds!
Nutrition
- Serving Size: 12 sliders
- Calories: 280 kcal
- Fat: 14g
- Protein: 20g